|
Forty Years later,
Since I like to tinker, I tried from the start to improve the way my boat was rigged and handled. Here are the changes I made in the forty years I sailed my boat. Self-Steering gear I had decided to spend the following winter in the West Indies and since I do not like being pinned at the tiller, I added a self-steering gear. I had already built one for my previous boat, a 24’ sloop, with which I had made my first single-handed passage between Percé and the Magdalen Islands in the Gulf of St. Lawrence, and had acquired some experience on this matter. Jean-du-Sud was steered by a wheel, so I fabricated an auxiliary rudder driven by a vane on a horizontal axis. This gear steered through many passages between the East Coast, the West Indies and across the Atlantic to Europe, but even though it held a good enough course, I saw many improvements I could make and a few years later, when I decided to undertake a single-handed voyage around the world through the Southern Ocean, I designed a third gear which I tested during this voyage. In 28000 miles I never had to steer, so I considered I could offer it to fellow sailors, under the name of CapeHorn. This has now become my main source of income. Rig The original mast of the Alberg 30 was not designed for standing through a capsize, a very likely accident for such a small boat playing in the Roaring Forties. So I decided to equip my boat with a heavier mast, supported with double spreaders and oversize rig. I honestly believed that this new mast would stand through a capsize, but I made two mistakes: the original mast was stepped on deck, but in order to allow passage to the fore cabin, it was supported under the deck by a horizontal beam joining the two bulkheads. I overlooked the fact that a much stronger mast would exert a much heavier pressure on its step. After a first knockdown in the Tasman Sea, this horizontal beam de-laminated and the deck was pushed down a full centimetre, causing shrouds to become slack. I had to stop in New Zealand to reinforce this beam with a massive piece of wood, doubled with a vertical post that I would put in place when there was danger of a knock-down.
I found at an excellent price a mast extrusion stronger than the original and the yard where I prepared Jean-du-Sud built small aluminum boats, so I could use metal scraps to fabricate the mast step, spreader and mast head fittings, reminding the welder that if they went underwater, I would have a thought for him.
I had
built the mast head fitting in view of rigging two parallel head stays.
While I used a single stay for the circumnavigation, I later acquired a
jib furler and I experimented installing the furler on one side, and a
second stay next to it on which I could hoist a smaller genoa or a
larger reacher. This worked so well that it became permanent and I
recommend it to everyone sailing offshore. The main
I still have the removable forestay, on which I can hoist a small jib made of heavy material with reef points which I use as a storm jib. I use runners to tighten the forestay when it carries a sail. Rigged like this, my boat keeps the advantages of the genoa furler while leaving all other options possible. A nylon reacher and symmetrical spinnaker (with sock) complete the sail inventory. Reefing When my boat was built, roller reefing booms were in fashion. A crank and a gear at the gooseneck turned the boom to roll the sail around it. I never understood why this fashion endured more than ten years, as this method was inefficient: when the sail was rolled, it became baggier to the point that it no longer went to windward, unless, to flatten it, one inserted towels or sail bags along the boom as the sail was rolled. When it was unrolled, one had to be careful to grab whatever had been inserted to avoid seeing them fly to leeward. Before I left for my first ocean passage, I had reef points sown in the sail at the level of the second reef, so that if a single reef was needed, I could roll the sail, but to reduce it further, I could reef it in the usual method: if more sail reduction was needed, I could roll over this reef. But I soon saw that this solution was inadequate at best; I condemned the roller reefing boom for good and had a first reef sown half way up and a third one above it.
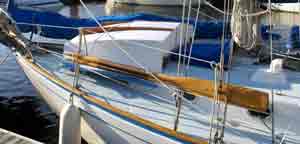
Dodger and weather cloths
I
installed weather cloths in the lifelines and stern pulpit. They
considerably improve comfort in the cockpit. Instead of the top
lifeline, I lashed them to the middle lifeline, which allows Trailer and outboard motor
Sailing
without an engine, I realized that I did not go as far in a given period
of time, but I had as much pleasure. Yet, after many years sailing
between Gaspé and Ottawa, I had seen all the destinations I could reach
without an engine and I considered re-powering my boat. But I like
questioning admitted ideas and did not
This crank-shaped mount pivots around a foot-long tube over the rail, bolted through the deck. The engine is clamped on a plate that pivots over the other end of the crank and to which is welded a 2.5” diagonal tube which absorbs the thrust of the engine and keeps it vertical. When the motor moves up or down, the front end of this tube slides along an other horizontal tube fastened over the rail, its front end fastened to a stanchion and its aft end bolted through the deck. A four part tackle with jamming cleats allows to pull the engine up with a minimum of effort. Materializing a trailer and a vehicle to tow it took a little while longer: I had to wait until sales of the CapeHorn, put on the market a few years earlier, had increased enough to generate the cost. I found a used three-axle trailer, which I modified so that it could hold my boat. The added weight of boat and trailer is about 5 tons and even though this is above the theoretical weight that this vehicle could haul, I acquired a GMC Suburban equipped with the towing package. The added cost of the trailer, Suburban and outboard motor was probably not more than the cost of a new diesel inboard engine and its installation. I am now at my second Suburban, the first one having died of boredom and mostly rust during the eight years Jean-du-Sud spent in Europe. Even though the beam of the Alberg 30 is three inches over the allowed limit of 8’ 6”, I never had any problem on this respect, the trailer itself being only 8’ wide, so the extra 3 inches at deck level do not show.
Mast Stepping System
The axles
and brakes of the trailer are not watertight, so to load or unload the
boat, I use a travel lift. However, I c On the deck, the mast rests on two roller-topped supports, one behind the mast step, the other at the stern pulpit. Those rollers allow moving the mast aft until the base of the mast is above the step and the axis inserted into the hinge. The pole, placed vertically above the base of the mast, is held aft with a foresail halyard and laterally with two cables acting as shrouds, led to the hinge in the cap shrouds.
To bring
the mast to the vertical, all I need to do is pull on the pole with a
tackle led to the bow. I use the f Electricity and electronics Some years ago, solar panels were the most expensive method to produce electricity, but fortunately, their cost has dropped dramatically. With two solar panels, one over the stern, the other on the cabin top, Jean-du-Sud is totally self-sufficient, even though I have an electric fridge and the computer is used daily for navigation and communication. For added measure, I have a windmill and still have the hydro-alternator, with a rotating propeller towed astern, which I had used during the circumnavigation and still use on offshore passages, to allow using radar on watchman mode. This radar was my 60th birthday present, after first a season spent in Maine. For my 70th birthday, I offered myself an electric anchor windlass, which I appreciate a lot. I recently rigged a mast head WIFI antenna, which allows connection to an unsecured network in most harbours and market the CapeHorn Self-Steering from the boat during summer mont. Electronics is kept to a minimum : a log doubling as dept sounder, a laptop with GPS antenna running OpenCPN ; I recently added an Ipad protected with a waterproof case, which I can bring on dec. Anchors While I sailed without an engine, I discovered that it was much easier to set two lighter anchors than a heavy one. Now that I have an electric windlass, the problem no longer applies, but I still have two anchors permanently at the bow, a Delta with 50 ft of 5/16” chain and 200 ft of 5/8” nylon, and a Fortress with 12’ of ¼” chain and 200’ of ½” nylon. As soon as there is any wind, I set both anchors. I also took the habit of buoying my anchors. The buoy and its line is permanently fastened to crown of the anchor; its length is just a little shorter than the distance between the bow and the propeller aft, in order to avoid fouling the prop if I have to put the engine in gear as soon as the anchor is at the bow, before having pulled the line aboard. In any event, I rarely anchor in more than 25 ft of water. The buoy not only shows the position of my anchors, it also allows, if the wind has shifted and I need to reset one of the anchors, to bring it to the new position by hauling on its trip line without having to pull it up. Even in a moderate breeze, I can move my boat by pulling on the trip line from the dinghy, powered by its small 3.3 hp motor. Dinghy
The
transom of my boat is too narrow to use davits, but under power or in a
moderate sea, I
This dinghy is doubled by two folding bicycles which both fit in the same cockpit locker. Those bikes are an essential part of the equipment of Jean-du-Sud and considerably increase the pleasure of cruising, while making getting supplies quite a bit easier. Nowadays, a 30 foot boat is considered small, but when I purchased it, 40 years ago, was a big boat. Forty years later, I remain convinced that my Alberg 30 is the perfect boat: powerful and seaworthy enough to sail in the Southern Ocean and sail around Cape Horn, but small enough to be hauled over land to whatever body of water I want to sail. Regardless of its size, a boat is always too small anyway.
Suite:
From the mailman's bag to |


 Some
riggers suggested single line reefing, but I found it much easier to use
two lines, a smaller one for the tack and a heavier one for the clew,
both on the same cleat. To make reefing even easier, I lower the sail
more than needed and re-hoist it once reefed. Naturally, when I built
the new mast, I made sure the track on the mast allowed the slides to
come all the way down to the goose-neck and had a jack-line rigged to
give slack to the slides when the luff is no longer under tension, in
order to avoid having to remove slides from the track. Two blocks with
swivel allow taking two reefs from the cockpit. I cut a slot into the
boom to lead lines forward inside the boom and rigged two sheaves before
the goose neck to bring the lines down to the deck. If I need to take a
third reef, I lower the sail almost all the way down and re-hoist once
reefed.
Some
riggers suggested single line reefing, but I found it much easier to use
two lines, a smaller one for the tack and a heavier one for the clew,
both on the same cleat. To make reefing even easier, I lower the sail
more than needed and re-hoist it once reefed. Naturally, when I built
the new mast, I made sure the track on the mast allowed the slides to
come all the way down to the goose-neck and had a jack-line rigged to
give slack to the slides when the luff is no longer under tension, in
order to avoid having to remove slides from the track. Two blocks with
swivel allow taking two reefs from the cockpit. I cut a slot into the
boom to lead lines forward inside the boom and rigged two sheaves before
the goose neck to bring the lines down to the deck. If I need to take a
third reef, I lower the sail almost all the way down and re-hoist once
reefed.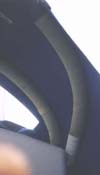 Mindful
of my comfort, I wanted a dodger that could resist a knock-down. Instead
of being supported with stainless steel tubes, my dodger is held with a
2 inch fire hose blown with air, into which I inserted a bicycle inner
tube. Once blown up, this hose becomes rigid, but if hit are plugged at
both ends with a PVC round piece with three hose clips to tighten them
over it. A tire valve screwed in place allows to blow them up, which I
need to do only once or twice a season and after more than 30 years, it
is still air tight.
Mindful
of my comfort, I wanted a dodger that could resist a knock-down. Instead
of being supported with stainless steel tubes, my dodger is held with a
2 inch fire hose blown with air, into which I inserted a bicycle inner
tube. Once blown up, this hose becomes rigid, but if hit are plugged at
both ends with a PVC round piece with three hose clips to tighten them
over it. A tire valve screwed in place allows to blow them up, which I
need to do only once or twice a season and after more than 30 years, it
is still air tight.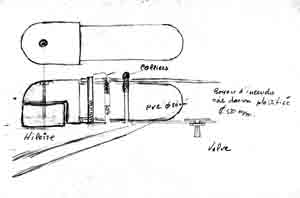 keeping only the bottom part, and improve appearance on this boat with a
low freeboard. When needed, I unroll the top part or roll both parts on
themselves and effectively remove them. They are held on the bottom
with bungee cords, which avoids tearing them when scooping a sea. This
investment in canvas improves comfort in the cockpit quite a bit more
than more expensive items.
keeping only the bottom part, and improve appearance on this boat with a
low freeboard. When needed, I unroll the top part or roll both parts on
themselves and effectively remove them. They are held on the bottom
with bungee cords, which avoids tearing them when scooping a sea. This
investment in canvas improves comfort in the cockpit quite a bit more
than more expensive items. Since
I wanted to do this voyage non-stop, I had to get rid of any useless
weight and the engine was the first item to go overboard. After I got
back, I was forced to sail without an engine during about ten years,
with the help of a long oar which was not used so much for propulsion,
but was very useful to pivot the boat and ensure it would take the wind
on the offshore tack when I picked up the anchor. It was also used to
keep the boat moving after I had dropped sail, to reach a dock. But in
calm, if I had to make port, I used my old Seagull engine on the Zodiac
lashed on the quarter, which pushed the boat at three knots.
Since
I wanted to do this voyage non-stop, I had to get rid of any useless
weight and the engine was the first item to go overboard. After I got
back, I was forced to sail without an engine during about ten years,
with the help of a long oar which was not used so much for propulsion,
but was very useful to pivot the boat and ensure it would take the wind
on the offshore tack when I picked up the anchor. It was also used to
keep the boat moving after I had dropped sail, to reach a dock. But in
calm, if I had to make port, I used my old Seagull engine on the Zodiac
lashed on the quarter, which pushed the boat at three knots.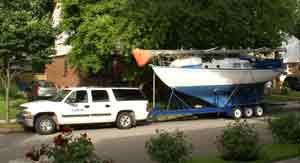 believe
an engine inside the boat would be the best solution. Bob Townsend, a
member of the Alberg 30 Association, had told me that he had a trailer
made for his boat and had hauled it to Newport RI to enter the Bermuda
One-Two race. This got me thinking: the best solution could be to put
the real engine in front, in a truck, with the boat behind, on a
trailer. This would allow me move my boat at 50 knots on the road, as
opposed to six on water with an inboard engine, and would allow access
to many more bodies of water.
believe
an engine inside the boat would be the best solution. Bob Townsend, a
member of the Alberg 30 Association, had told me that he had a trailer
made for his boat and had hauled it to Newport RI to enter the Bermuda
One-Two race. This got me thinking: the best solution could be to put
the real engine in front, in a truck, with the boat behind, on a
trailer. This would allow me move my boat at 50 knots on the road, as
opposed to six on water with an inboard engine, and would allow access
to many more bodies of water.


 left
no space, which made handling foresails difficult. In 2001, before I
sailed across the Atlantic, I stopped at the Magdalen Islands and traded
it for an Avon inflatable, with a CO2 cylinder. After I got
back, I asked my friend to make an
left
no space, which made handling foresails difficult. In 2001, before I
sailed across the Atlantic, I stopped at the Magdalen Islands and traded
it for an Avon inflatable, with a CO2 cylinder. After I got
back, I asked my friend to make an 
 use
a stanchion to hoist it so that it lays flat against the quarter, above
water. A dinghy often needs to be carried over land and this year, I
had the idea of installing a wheel in the centerboard trunk, which makes
it possible to roll it without any effort like a wheelbarrow, oars being
used as handles.
use
a stanchion to hoist it so that it lays flat against the quarter, above
water. A dinghy often needs to be carried over land and this year, I
had the idea of installing a wheel in the centerboard trunk, which makes
it possible to roll it without any effort like a wheelbarrow, oars being
used as handles.| CapeHorn Self-Steering Gear |
| 28 000 miles without Steering |
|
CapeHorn Renders others Obsolete |
| CapeHorn Self-Steering Gear... |
| Yves Gélinas on Self-Steering |
|
How does CapeHorn Compare with Monitor |
|
Quotes from satisfied CapeHorn users |
|
Boats Steered with a CapeHorn Gear |
| Owner's Manual (PDF) |
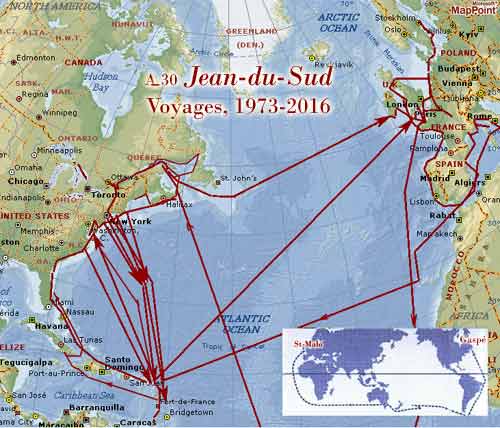
| The Boat, the Crew and their Voyages |
| The Alberg 30 Jean-du-Sud... |
|
The Great Voyage of Jean-du-Sud... |

|
An
image is worth a thousand words
We
will suggest a model and
its installation, |
|
Witness how some of our customers have, on their blog or web site, described their installation and use of the CapeHorn |
Read Andy Schell's article on
Self-Steering
Jean-du-Sud and the Magick-Byrd,
the book by Yves Gélinas that narrated his 28 000 mile single-handed
circumnavigation through the Southern Ocean and around Cape Horn aboard
Alberg 30 Jean-du-Sud, has been translated in English and published
by Andy Schell and Mia Karlsson of 59 North Sailing.
It was first published in French in Canada in 1986, then in France in 1996.
Available both in print, and as a podcast,
read by the author.
-Order
the Book-
-Download
the Podcast-
CapeHorn is the choice of
Andy Shell and Mia Karlsson.

Donna Lange, for
Sail Twice Around
Non-Stop Sail
around the World
With Jean-du-Sud Around the World
-watch the trailer and order the video-
Listen to David Anderson's Sailing Podcast featuring Yves Gélinas